
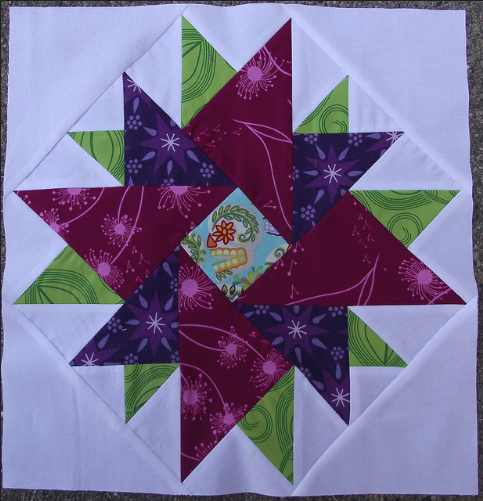
Block Size: 12.5″ unfinished
Why does this block have two names? Well, over the years many blocks have been named and renamed although I am not sure why. The reason that I am using two names is because I have found it under both names: Double Aster (directions here) and as Modern Star (for which there are directions here). I followed Laineybug Designs’ Modern Star Tutorial but modified a step or two. Feel free to follow my directions or either of the two other linked tutorials.
I must confess, I love this block…I think it is beautiful! My version above is subtle and I left the center block white, like my background but feel free to change it up. Below is a beautiful example in bold colors with a fussy-cut center block that is a lovely, whimsical accent! Laineybug also posted several versions if you need more color inspiration.
As for the construction of this block, it poses a tiny bit of a challenge in that there is a partial seam and you have to cut and sew lots of triangles but it actually goes together very easily…I promise 🙂 However, (as I always caution) be sure to check your color placement before sewing pieces/units together. It is easy to get distracted and sew units together incorrectly, unfortunately I can attest to that! Good thing I don’t have a problem with a seam ripper… Let’s get started:
CUT YOUR FABRICS:
7/27/15 CORRECTION: The cutting measurements are embedded in the image: The squares that are NOT cut diagonally should be 3.0″ NOT 3.5″. You will cut 2 each of 2 3.0″ squares (at the top of the image).

Background Fabric (white):
- Cut two (2) 5.7/8″ squares, then cut them diagonally (outer corners of block)
- Cut two (2) 3.5″ squares, then cut them diagonally
- Cut two (2) 3.0″ squares, then cut them diagonally
- Cut two (2) 2.3/8″ squares, then cut them diagonally
- Cut two (2)
3.5″3.0″ squares - Cut one (1) 2.5/8″ square
Large Star Points (yellow fabric):
- Cut two (2) 5.1/8″ squares, then cut them diagonally
Medium Star Points (blue fabric):
- Cut two (2) 3.7/8″ squares, then cut them diagonally
Smaller Star Points (black fabric):
- Cut two (2)
3.5″3.0″ squares - Cut two (2) 2.3/8″ squares, then cut them diagonally
MAKE SMALL SQUARE/TRIANGLE UNITS FIRST:
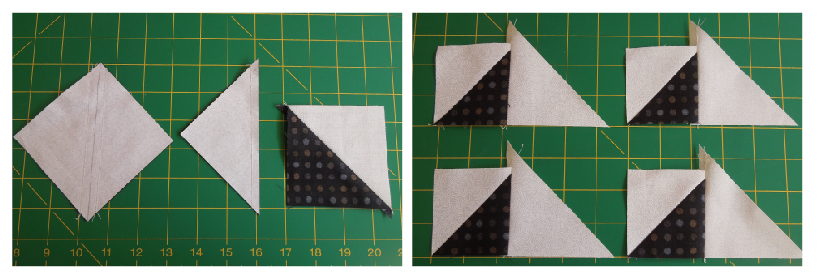
Step 1: Begin by pairing up the background (white) and black 3.5″ 3.0″ squares, next draw a diagonal line on the lighter of the two fabrics. Sew 1/4″ to either side of this line, cut on the line and press open. Repeat with the other set of squares yielding four 1/2 square blocks.
Step 2: Add a triangle (cut from the 3.5″ squares) to the black fabric, making sure that they are paired as shown above. Align to bottom edges and stitch. Note that the triangle will “hang off” the end.
Repeat steps to create 4 units, set these units aside.
MAKE THE LARGER SQUARE UNITS NEXT:
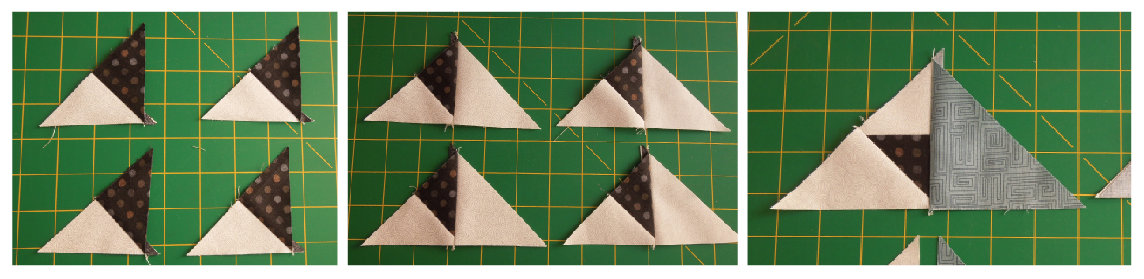
Step 3: Sew together pairs of two small triangles cut from the 2.3/8″ squares; background and black fabrics. Sew them along the short side to create a triangle (not a square), making sure that your background (in my case: white) fabric is on the right. I photographed them in the direction that you will be piecing them to the next bit so I suppose I should say the background fabric is on the bottom…
Step 4: Now add a triangle cut from the 3″ square background (white) fabric to the black/white unit, creating a larger triangle. Be sure to pair up the triangle to the black/white unit as shown above.
Step 5: Next add a blue triangle cut from the 3.7/8″ squares to the black/white edge.

Step 6: Finally, add the large yellow triangle (cut from the 5.1/8″ square) to complete a square. Repeat to create 4 units.
Step 7: To each of the larger square units you will now add a unit created in steps 1 & 2. Refer to the image above, on the right. Pair up the units to the yellow fabric, aligning the bottom of the black/white square with the yellow triangle. Be sure to pair them up correctly! Note that the triangle portion will “hang off” the edge.
Repeat for all 4 units.
ASSEMBLING THE BLOCK:

Step 8: Pin the 2.5/8″ square to one of the units created above. Align as indicated in the photo above, pairing it to the opposite side that you added the square/triangle units to and to the yellow triangle. Stitch together stopping about 1/4″ before the interior end. Press open.

Step 9: Working clockwise, add each of the units as shown above.
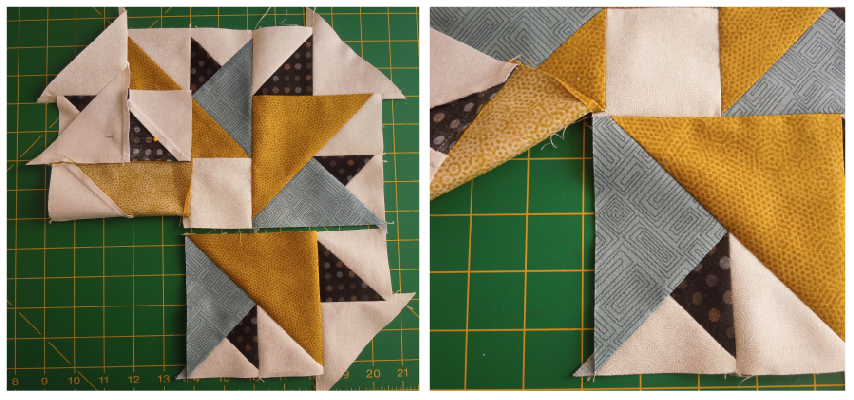
Step 10: for the last unit, fold back and pin the flap that was partially sewn to the small center block out of the way. Refer to the image above on the left. Then sew the last unit in place.

Step 11: Next you need to fold the block along the resulting partial seam and stitch that seam closed.
FINISH THE BLOCK:
Yeah, almost done 🙂

Step 12: Add the largest background fabric triangles (cut from the 5.7/8″ squares) to complete the block. In order to center them easily, I pressed a small crease in the large triangle to mark the center, and drew a tick mark on the block (using the joint of the black and blue fabrics as a reference) at its center point. Then I pinned the triangles in place and stitched them on.
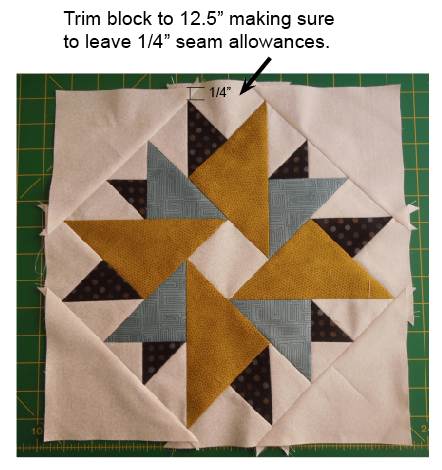
Step 13: Press your block and measure (mine was 13″). You will need to trim it down to 12.5″ making sure that you leave 1/4″ seam allowances on all sides.*
* Laineybug’s directions indicate that you will need to trim the block down, the Double Aster directions do not…I checked the measurements and they both use the same sizes, it’s a mystery… Let me know if you had to trim or not…I’m curious 🙂
Violá, you are done!
